I am adding two new cards to my AIW group.
Wednesday, May 18, 2011
Sunday, May 15, 2011
More Alice In Wonderland Cards
I will have to come back and describe the items I used for these cards, because I have to make this post quickly. Today is my daughter's 32nd birthday and we have dinner plans. Happy birthday to my darling daughter, Alyssa.
This card is an easel card. I love this style for this card. This is a "Tea Party" birthday card. I'm unsure of the brand of the stamp. I bought it as just a rubber stamp last year at the Heirloom Stamp Show and then put my own backing on it. I started out with blue card stock and made the easel. If you don't know how to make an easel card, it is rather simple and you can find a tutorial on Splitcoaststampers.
This next card is my favorite so far, of my AIW cards that I have made. I think it's because of the sentiment and the image fitting with it and the wood paper. As soon as I bought this stamp I knew what I wanted to do make with it.
I used green card stock for the card. The lighter green textured paper, on the front background, is a piece out of a DCWV stack pad - "The Guy." I punched the corners with a Fisker's "Flowers" corner punch. The seed stamp is a Stamp Oasis acrylic stamp. I cut the middle out, along with the bottom of the stamp, which had a tree for each season. I used copics to color it. The inside wood paper is from My Mind's Eye - Stella Rose- Mabel "Joy" Woodgrain Paper. I cut the "knot" hole out separately and popped it up. The Alice In Wonderland with the rabbit is from TJ Designs Rubber Stamps "Down the Rabbit Hole. It was a square stamp, but I fussy cut out Alice and the rabbit image. I used copics for the color. The words stamp is from Invokearts #6516-D2. I used Stampin' Up craft ink and embossed it with Stampendous clear embossing powder. The ladybug is a button with the shank cut off, out of my button bin.
Tuesday, May 10, 2011
Mother's Day Cards
I decided to post this card under a new post instead of adding it to the post with my other card, for my BFF. I made two of these cards, one for my mother and one for my MIL. My mom's is being given to her later this month with her present when I see her, but my MIL's is being mailed by my hubby with her gift.
I used some teal card stock out of my stash for the base. The background paper was from K&Company designer mat pad. I love the colors in this pad, green, teal, and browns. The edges are punched with Fisker's border punches. I sprayed the paper with Tsukineko's sheer spritz sparkle. I used Spellbinder's "Beaded Circles," for the outside circle and "Standard Circles Large," for the inside circle. The flower stamp is. I used to color it and added bling to the center. The bottom butterfly was punched out of the same coordinating paper with an EK Stampin' Up butterfly stamp and the top one is a MS butterfly punch. I used glitter gloss pens to accent it and some bling. The flower is by Prima with bling in the center. The rickrack and ribbon are out of my stash, from many years of collecting these items for sewing. LOL The flower and sentiment stamps are from "Messages for Mom" set by Stampin' Up, as well as the mom stamp on the inside. I embossed the sentiment and used Copics on the flower.
I hope they both like their cards, even though they will receive them late.
Labels:
Copics,
EK,
Fisker's,
KCompany,
Martha Stewart,
mother's day,
Prima,
Spellbinders,
Stampin' Up,
Tsukineko's
Sunday, May 8, 2011
Cricut-tastic Blog Award
Blog Award
I am so honored to have been given a blog award by Beejay at Sleepy Cat Crafts. She is the owner of a blog I recently started following and you will want to follow too when you check out her blog. I love her creations!!
So here is the award Beejay passed on to me:
So here is the award Beejay passed on to me:
Your Blog has been deemed Cricut-tastic!
Wear this Badge proudly on your Blog
share it with friends! Since Cricut is 5 years old and they have an E2 out share this award with 10 people that you think have Cricut-tastic Blogs!
So I am passing this award on to the following people, in no particular order. This was not easy for me, since I’m new to the blogging world. In fact I received this award last week and it has taken me 5days to give it away. On my quest, I have seen some very fun and exciting blogs. There is such incredible work being done by so many talented people in this cricuty community. I would have loved to pick more, but these are my choices, in no particular order.
1. Jenny
2. Lisa
3. Monica
4. Tanya
5. Kelli
6. Kimberly
7. Mary
8. Patty
9. Erin
10. Giselle
You also have to tell 5 Cricut Related things about yourself:
1. I received my Cricut original for a birthday present by my husband, shortly after they released it.
2. I bought a cartridge last year at the stamp convention and luckily only went across the street to eat lunch, because when I opened it up to show my friends, I found the box to be empty. They gave me the demo box by mistake. We had to go back into the convention and by doing so, all 3 of us spent more money!
3. I will never pay full price for a cartridge. I try to get the best deal, so that I can buy more. LOL
4. I asked for a Gypsy for Christmas 2010 and my hubby had the hardest time finding one. He ordered it online and started panicking when it wasn’t delivered until Christmas Eve. (He told me this after he gave it to me.) Then I hooked it up to my Cricut, followed all of the directions on updating everything and Provo Crafts software corrupted my Cricut. We messed with it for about 2 weeks, thinking it was how we had it hooked up. Then I called Provo (2 ½ hours on the phone) and they told me that my Cricut was corrupted. I panicked. I thought great, now what. I asked him what I was supposed to do now that it was broken. He said, no worries, we will send you a return authorization and Fedex it back to them (they paid postage) and they would send me a new one. I did and received a new one in less than a week.
5. I have used my new Cricut, but have not hooked it up to my Gypsy yet. Going to do it soon, but just haven’t had the time or maybe I’m scared. LOL
Have fun and give the award to others!
Rules per http://www.inlovewithabug.blogspot.com/
Thursday, May 5, 2011
Mother's Day Cards
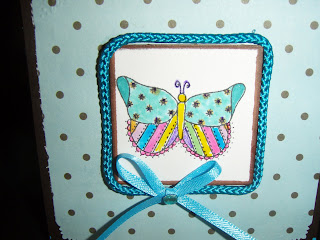
I thought I would have been done by now, but oh no, what has happened to my week? I did get one card done today for my BFF. I will have to get the other ones done tomorrow, but I don't have to mail them. I delivered my card in person to my BFF. She really liked it. I hope you all do too. I made my first easel card. I think it turned out good. I was really happy with the color choice too. I had the paper (Colorbox Blue Mini Dots), ribbon, trim, and Prima flowers all in my stash, so I really liked that everything came together. The butterfly stamp is a Lockhart stamp, which is stamped on a twinchie and the sentiment is from Stampin' up. I should have embossed the sentiment. It didn't come out quite right for what I wanted, it needed more pop.
Wednesday, May 4, 2011
Spring Banner
I wanted to post my spring banner, although my stamping buddies and I each made one of these back in February, so we could have them hanging up for spring. I haven't actually felt like spring had sprung, until the last few days by seeing some of my flowers blooming and sunshine. The gray skies and rain, in Seattle, can get a bit dreary after awhile, even if you are a native with webbed feet.
There is no stamping on any of this banner. Very unusual for me, but the paper and all the bling made it unnecessary, except the bees and hive. They were stamped on shrink art plastic and then shrunk. So I suppose there is some stamping. Since this was my month to host our get together, for a project of the month, I chose to do the spring banner, but was responsible for making the prototype and preparing all of the supplies for the other 3 buddies. I do this by putting everything that is needed into a plastic baggie, so that each person has what they need. Then each person works on a different tray until she is finished. I love how this turned out. Enjoy!
All of the letters were cut with my Cricut. I will have to find out which cart I used, and then revise this. However, they were all cut with a shadow, so that I could do two colors. The paper was from DCWV glitter papers and then just card stock behind them. All of the cards are 1/4 of a piece of a card stock. Then another background paper attached to it. Many of the trims are from K&Company. I love their packets, which are only a few dollars and I only buy them when they are on sale at 40% off. LOL I tried to do make each card as a representation of something about spring.
 | |
| This is from birdhouse paper, with a bird brad. | I actually got sticks out of my yard for the branch. The nest is moss. |
 |
| I used foam flowers and bling on this card. |
 |
| This had shrink art for the bees & hive. Some bling on the bottom strip. |
 | ||
| This is a foam bunny,but I used my sizzix to | cut out the basket and the eggs. |
 |
| More foam butterflies and a flower. |
 | ||
| I used some buttons for the dragonflies. The fence is wooden, from JoAnn's and some silk flowers from my stash for the garden. |
 |
| This card is for St. Patrick's Day. The paper was perfect & I had confetti & the coin in my stash. |
 |
| What's spring without seeds? I am not sure of the brand, but these came in a package of 6, I think and then the trim is K&Company. |
 |
| I used buttons for th the butterflies. The yellow flowers are MS & the trim flowers are K&Company. I had the bobble trim that I added to the bottom. |
Saturday, April 30, 2011
Bean's Keepsake Box
Today I made a memory box for baby Bean, Kari and Erik's new baby, who is arriving at the end of May. My daughter, Alyssa, is having a shower today for them. The theme is ducks, so I stayed with the theme for the box. I put glued light blue paid Paper Pizazz paper to the outside of the brown cardboard box, which I bought at JoAnn's. I used K&Company' Itsy Bitsy's duck and yellow squiggle trim around the lid and bottom edge of the box. I put a yellow heart button with orange embroidery thread on each corner of the lid. The duck in the center of the lid is a wooden duck that was already painted, from JoAnn's. I used stickles on the wing to brighten it up, along with a button for the wheel to match the trim and a bling in the center. I added the green rivet to the eye to make it more 3D. The saying on the side is also from Bayby Boy Word Icons, made by K&Compnay. The pictures didn't turn out as good as it looks. I need a better camera. After it was all done, I filled the box with my presents of a baby 8x8 scrapbook, a sleeper and an outfit and last but not least my baby card with a gift card to Amazon.com.
 |
| Start with the brown cardboard box |
 |
| cut a piece of paper to overlap the edges and glue or tape down |
 |
| wrap the paper over the edges and secure it |
 |
| do the same for all sides and then the edges of the lid too |
 |
| cover the top. I cut a piece that was the exact size of the lid |
 |
| I added the duck and squiggle trim around the edges |
 |
| I added the boy words to the side of the box |
 |
| the four corners have yellow button hearts with orange embroidery thread. The duck is wooden with a button for the wheel. I added the stickles to the wing and the rivet to the eye. |
 |
| And it wouldn't be complete without stamping with your name. I did this on the bottom of the box. |
Sunday, April 17, 2011
Simply Adorable Bears
 | |
Saturday, April 16, 2011
A Mermaid's Crafts
A Mermaid's Crafts is offering blog candy of a free Cricut Summer Collection cartridge, ends April 16.
Wednesday, April 13, 2011
Polar Bear Nut Cup
Please go vote for my Polar Bear Nut Cup. I made 30 of these for my M-I-L's Rebekkah's regional meeting. The theme was Coca Cola. Plus a few more for my BFF's.
Craft Idea's Contest
I used a Memory Box polar bear stamp. I increased the size on the copier. I covered the card stock with sticky backed fleece paper. I drew the face on, used brads for the eyes, and felt for the nose. The ribbon is made from some left over Christmas ribbon. The skies are made from red Popsicle sticks. The bindings are wire twisted around. The poles are toothpicks with red and white twine for the handles and red duct tape for the top. I used a snowflake punch on shrink plastic and shrunk it for the snowflake on the bottom of the pole. Cotton balls were used for the snow. I used a box die cut for the nut cup and cut it down to size. The coca cola bottle was a magnet from my fridge that I put on the printer and shrunk it to this size. I colored the lid red.
Monday, April 4, 2011
Christmas Houses
I wanted to post these pictures, from making our Christmas houses. We each made one. They were from Stampin'Up. We decorated them with paper and trims from KC & Company. Even plastic lights around the edge. It was a lot of fun. My stamping buddies, Gina, Dianne, and Laura all hard at work making their houses.
Subscribe to:
Posts (Atom)

















 I Love TheHIVE


