CLICK HERE FOR FREE BLOGGER TEMPLATES, LINK BUTTONS AND MORE! »
Showing posts with label Halloween Banner. Show all posts

Saturday, September 1, 2012

2nd day 9-2 Halloween Spooktacular Banner Hop for Special Needs Children

   na 


Welcome to the annual Halloween Spooktacular Banner Hop for Special Needs Children!
I am delighted to join with more than 3 dozen other women who have each made at least one Halloween-themed banner that will be donated to hang in the room of a medically-fragile child at Pediatric Specialty Care in Pennsylvania.

Our Hop Hostess (Ellen CardMonkey Jarvis) works at PSC’s Bucks County site as Admissions Coordinator. The Banner Hop starts there, so please be sure to circle back to the beginning to see all of the terrific banners have been made for these very special children.

Ellen shared this information with us about Pediatric Specialty Care: “PSC is a very special place where children stay either long- or short-term, typically after hospitalization.  Most are dependent on ventilators and other technology to survive. Some have been born too early or with genetic diseases or birth injuries.  Other children suffer injuries later in life that require constant care later, including brain injuries from trauma or loss of oxygen (from choking, suffocation or drowning) and spinal cord injuries.

These children and their families -- and PSC’s staff -- will be thrilled to receive the Halloween banners, to help brighten the season when their friends and siblings will be out trick-or-treating.”
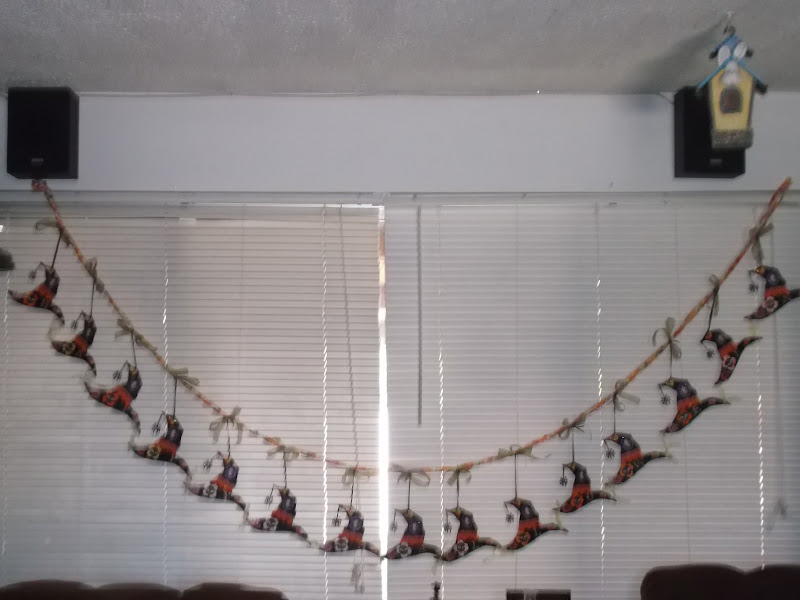
Here is the banner I am sending to a child at PSC:

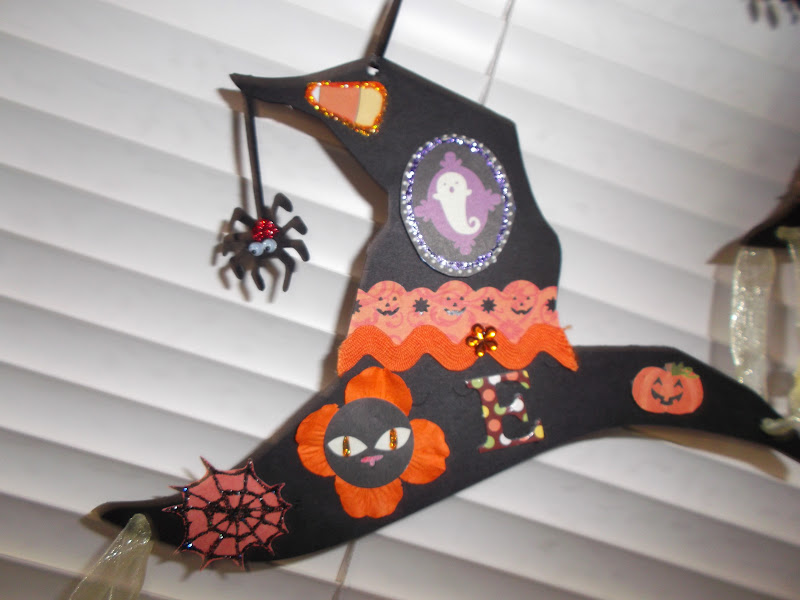
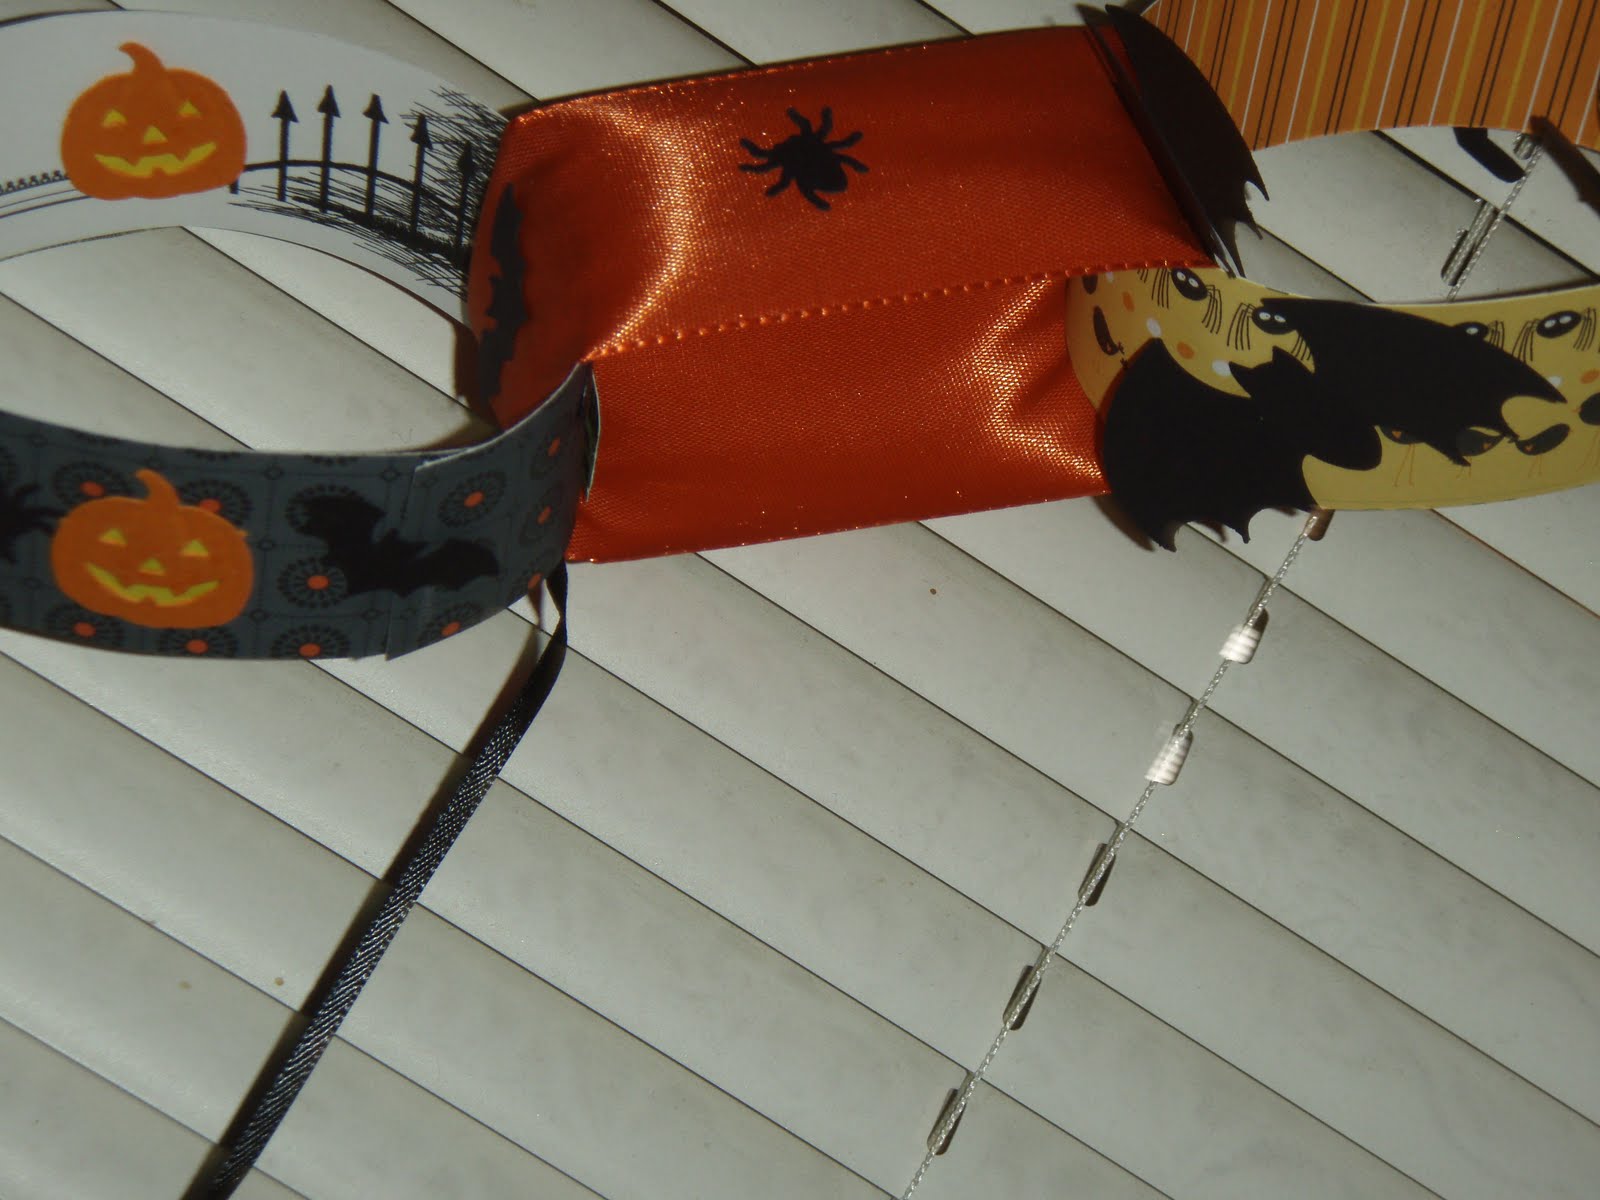
The banner says Happy Halloween in chipboard letters that I had in a packet. All of the pennant pieces are witches hats, cut from the Cricut Happy Haunting Cart. It is cut at 5.5 inches. I cut 30 black hats and sandwiched a piece of chipboard between to make it sturdier. I decorated the hats with paper cut from my Halloween stash. I added orange rickrack and an orange flower on the headband. I put eyes on the spider. I used a flower petal behind the cat eyes. Then to top it all o, I added stickles.  I hung each hat from a piece of black ribbon and attached it too the main ribbon with green sheer ribbon. They wanted to dangle backwards, so I attached them together with an additional piece of yellow sheer ribbon at the brim tips to each other. This seemed to help.


Please move on your way to the next stop, which is: Susan! Thank you again for visiting!


This Hop is two days (Saturday, September 1 and Sunday, September 2), and on each day you will see different banners. Be sure to visit on both days to see the truly inspirational work of these generous bloggers, and leave some love (comments) on as many sites as you can – because if you do, you can up your chances to win some Spooktacular blog candy, including from these sponsors:

Madge's Scrappin' Lounge is donating a $25 gift certificate to her store!

Lisa Peters - $15 shopping spree to her adorable paper piecing store at Scrapping With Lisa Designs.

Lucy Kelleher - Independent Consultant for Close to My Heart is donating a $10 Gift Certificate which you can use towards any Close to My Heart products!  To enter to win, you will need to leave a comment on her blog and become a follower of her blog. For an additional entry, "Like" her Facebook page.

Debi Weidleman - Independent Consultant for Stampin' Up is also donating a $10 Gift Certificate which you can use towards any Stampin' Up products.

Erica's Craft Room is donating two Cricut cartridges (!!!) -- Pretty Pennants and Mini Books.  Please visit and say thank you to Erica on her blog.

To qualify, all you have to do is leave at least one comment on our Hostess’s site - CardMonkey What was your most memorable Halloween costume, and how old were you when you wore it?   Leave additional comments on as many banner makers’ sites as you’d like for extra chances to win!  Prizewinners will be announced on Monday, September 3 on the CardMonkey site, where there will be a round-up of all of the Spooktacular banners for 2012.

You can go back yo beginning at CardMonkey's site, if you got lost along the way.

 Thanks for visiting.  
Please move on your way to the next stop, which is: Susan!

Sunday, September 4, 2011

Labor of Love Halloween Blog Hop Day 3 and 4


Welcome to Labor of Love Halloween Hop, second half! This is Day 3 and 4 of the hop.  If you came from Donnalee's then you are in the right place. If you just happened here, then make sure to start at Ellen's blog so that you can check out all of the great banners. This hop is for a wonderful cause and there is some blog candy at the start of the hop.
I happened upon this group and thought what a great thing to do! Make a Halloween banner and donate it to a hospital for critically ill children - Pediatric Specialty Care, in PA. I am in the second group of the hop. The first half of the hop was on Friday and Saturday and had some wonderful banners. If you missed that part, make sure to go back to Ellen's blog and go through the first half of the hop.  I also had the benefit of my two BFFs joining in on this event with me. We gathered at my house and each of us made a different banner for the kids. I then mailed them all to Ellen, in PA, so that she could deliver them to the hospital with the other banners.
If you would like to be a part of this charitable event, you can visit Madison’s blog for information about making a Halloween card for donation.
This post is a little long, because I am posting all 3 banners on my blog. My BFF’s are not bloggers, but I wanted to share their banners too. There are quite a few pictures here, so that you can see the detail that we all put into the banners.
Your next stop is Nancy.

My banner says PUMPKINHEADS. It was a lot of fun making the banners. I didn't use the Cricut, but I did use quite a few different Sizzix dies and embossing folders, on my Big Shot.  I also used stamps and cut out images from different pieces of Halloween paper. The letters were plain chipboard letters I had in my stash. So to spruce them up, I covered them with glue and dipped them into orange Martha Stewart glitter.

It's hard to tell here, but the legs and feet are a stamp, all colored with Copics.  The heads were from a couple of packages of Halloween items that I found in the $ bin, while waiting in line at Joann's. I colored the beads on the trim with Copics too.

I used a triangle punch for the banner, punching glitter paper. Then I added some twine to the top. The candy corn is glittered and came out of my stash of foam items. I added the purple brad witch hat to the frog, which is a K&Company chipboard piece.
This came from just a piece of Halloween paper, then I added some K&Company fencing, bat trim and a few ghosts and a bat to spruce it all up.

This owl doesn't say hoo hoo at Halloween time. The tree stamp is a Memory Box stamp that I just bought a few weeks ago. Gina gave me the cute little owl and then I stamped the BOO BOO on it. The trim at the top is a MS edge punch.
What would Halloween be to a child without candy? This is just a candy corn piece of paper with added chipboard pieces of candy.

I liked this panel the most. I think it's because it is all paper pieced. I stamped the scarecrow on different pieces of paper and then cut out the each piece out and layered it.  I added a bit of twine on the hat and flower button. Then I added some heart sequins on the face, along with brads for the eyes and nose.  The "i" for the letter on this panel provided the perfect post for the scarecrow. The pumpkins were fussy cut and doubled so they are popped up.
I had this frame in my stash. I added this paper behind it and thought this cat went well with the paper, both looking a little frantic. I added the witch hat brad and a couple of stickers to the corners of the frame.

This background paper was perfect for this panel.  I added the witch making her potion/ The spider ribbon is supposed to represent a shelf with extra bottles of things she might need. I cut the saying out of a piece of paper along with all the bottles and doubled them, so they would pop up.

Spiderweb paper for the background could only mean one thing - spiders on the panel. I added these cute little spider brads, along with a K&Company spider trim and the bottom EEK! BOO! SPOOKY trim.

The pumpkins on this panel were fussy cut from paper and doubled for popping up. I added some green pipe cleaner for the stems. The post with the signs is K&Company, from my stash.

I had paper that had  banners on it, so I cut a strip and then used my MS pumpkin edger on both sides. I love the wiggly eyes in the BOO. I then added more chipboard pieces that I found in my Halloween stash.

This haunted house was made from a Sizzix die. The windows have a treat bag that is covered with spiders and webs that I found at the dollar store last year. I then added yellow paper behind it. I made the door out of wood like paper and added a brad for the door handle, along with a bat brad for the door knocker. Then embellished the rest of the panel with some bats and ghosts.

I strung it together with ribbon, but before sending it to PA, I changed the ribbon and made bows in between each panel, so that it would hang better.


****************************************************************************
Now for Gina's banner. She used 1/4 sheets of black card stock and added items to each card.She made it read SPOOKTACULAR. She used some of my Sizzix dies and embossing folders on the Big Shot and glittered a chipboard key that I had in my stash to dangle from the haunted house's door.  She also used Memory Box's dies for the fence and bats.  She used K&Company chipboard letters that she found last year and since they were orange, they worked out great!


This has the Memory Box die used for the fence.

This is the Sizzix haunted house die.

The ghosts are from a Sizzix die


This panel was made from a Stampin' Up embossing folder for the spider web. The fence and the bat are from the Memory Box dies


Another Sizzix haunted house cut from different paper, then yellow paper added for the lighting of the windows. See the eye added in the center window? Here is the chipboard key that she attached to the door knob.

A couple more ghosts cut from some more Sizzix dies added over some glittery pumpkins and orange netting ribbon.
 ***************************************************************************
Last, but not least is Laura's banner. She made a chain link banner, with dangled items. The chain links were made from strips of paper and then glued together. She added some ribbon for some of the chains too. She then added spiders and bats, a dangling haunted house, and in the center a 1/2 sheet of paper with a raven on both sides.

We had Laura put the banner around her neck and told her it was a new fad for the latest jewelry. LOL


The spiders and bats were punched out of EK punches.

The little bats were made from the Memory Box die.

More spiders and bats punched out and the spiders are hanging from ribbon.


The center has the Raven on both sides of the orange card stock.

A few more bats, spiders, and pumpkins.

Another version of the Sizzix die haunted house.


Hooked all together it is a Halloween chain banner that any child would love!

***************************************************************************
Remember to leave a comment so that you can be entered into the drawing for the overall Labor of Love hop prizes that were donated by our sponsors:


Read the complete rules on entering for more chances on the blog candy at Card Monkey's Business Blog.

I had a lot of fun making my banner.  I especially liked the time spent with my two BFF's who joined in on the fun, donating their own materials and time.

Your next stop is Nancy.